We understand that issues can be frustrating, and we want to do our best to help resolve them for you. We’ve added some answers to the most common questions below. Please review to see if these provide answers or solutions for you.
Those pesky weeds and that dingy looking mold can be very unsightly to see. Fortunately, keeping them away will be easier than ever after your pavers are sealed and you have hardened sand in your joints.To keep weeds away just keep all organic material off the patio. We’re referring to organic material such as mulch that washes on to the patio, leaves, grass clippings, twigs, flower buds, etc. This organic material decomposes and turns in to food thats crucial for vegetation to germinate and thrive. Organic material also shields the sand joints from the sun keeping the environment moist and vegetation loves moist environments.
Please watch this video that explains why you have weeds to begin with:
Here are 3 things you can do now to eliminate any existing weeds or mold:
- If you’re spotting weeds after only a week or two after our process, it’s likely that during our cleaning process there were a few weeds that survived the high heat cleaning and you’re seeing a couple of them sprout up. This is very common. If you’re experiencing this, we suggest spraying these weeds with a weed killer.
- Spraying any weeds that happen to germinate is our recommended solution. If you catch them early enough, you can pull them, just try not to damage the sand joint.
- If you’re experiencing mold or algae, we suggest following the DIY Aftercare instructions that we had emailed you upon completion of your project. Specifically the instructions for applying cleaning strength white vinegar. Here’s a link to these instructions. Keep in mind that we suggest following the instructions in this guide at least once every 4 weeks: bit.ly/diy-aftercare
Here is the #1 thing you can do to minimize future weeds from coming back:
- Following our DIY Aftercare Guide (https://bit.ly/diy-aftercare) is your best recourse for minimizing weed and mold growth. Please watch the video above which explains why you have weeds to begin with.
FAQ: I thought your process is supposed to prevent weeds from growing? Unfortunately, this is not the case. Our process can help keep weeds away because it makes it easier to keep organic material off your pavers. It’s the ‘keeping the organic material off your patio’ part that keeps weeds away. Your estimate says it best:
“This process is not capable of preventing weed or mold growth in pavers. Nor is any other process or product. Only adequate maintenance will prevent weed growth. This process will, however, make this maintenance easier by hardening the sand in the joints so that the sand doesn’t wash away when you clean your pavers. Weeds grow from seedlings that blow on the pavers.
These microscopic seeds travel through the air and can land on top of the paver joint sand, and if the conditions are right (temperature, moisture, shade, etc) these seedlings can take root from above and the root will make its way down in to the joint sand. This process is known as germination. The only way to prevent/minimize this from happening is to keep the seedlings blown off your pavers and frequently rinse off the organic material from your paver joints. We suggest performing this maintenance at a minimum of once per month.“
It’s important to understand that weeds are a result of site conditions, as explained in the video above ‘Why do my pavers have weeds‘. Properly installed pavers will have minimal issues with weeds. In almost every case, there is a moisture issue when weeds are present. This can be moisture issues due to inadequate slope on the surface of the pavers (minimum of 1/4″ of slope per 1’ of patio is required for adequate drainage), inadequate slope on the subsurface (beneath the pavers – think where does the water go when it goes down through the pavers), landscape beds or lawn mounded too high preventing water from escaping the patio, pavers installed directly over concrete without drainage provisions made in the concrete to allow water that goes through the pavers to escape, or too much shade.
Have you considered our Aftercare program? If you sign up for our Full Service Aftercare program, we can help keep your pavers looking great so you don’t have to. Upon the completion of your project, we emailed you an estimate for our Aftercare Service.
Why not just use mortar or grout
Polymeric sand is a great alternative to mortar or grout due to its ease of replacement when the time comes. Mortar or grout can crack over time due to movement or freeze/thaw cycles. To replace the mortar or grout at that point, it requires grinding out all the mortar one paver at a time and then re-grouting each joint. This process is very costly and in many cases can cost more than the original installation of the patio. When polymeric sand is ready to be removed, you can do so with the use of a pressure washer and easily install back new polymeric sand. The one downside to polymeric sand is that you will need to replace it more frequently than grout or mortar, but it will be significantly easier and less expensive.
What are reasons polymeric sand comes out?
1. Inadequate surface or subsurface drainage: In order for polymeric sand to be a long term solution, pavers must have good drainage on the surface of the pavers and also on the subsurface (beneath the pavers). When either the surface or subsurface of pavers have less than ideal drainage, it means the polymeric sand may not last as long as areas that have great drainage. When both the surface and subsurface have poor drainage, the polymeric sand may have a very short lifespan and in some cases never harden at all.
So, in other words, the downside to polymeric sand is, if you have an area of your pavers that holds water and/or stays damp all the time, the sand wont get hard and will remain soft in these areas. If it remains soft all the time, it will breakdown to where it’s not able to get hard again or harden at all. These areas will need replaced more frequently than drier areas of your pavers. These areas will also be the first to grow mold and attract dirt. When a surface is damp or wet, airborne dust and dirt will stick to it. Overtime, it will build-up. We strongly suggest following our DIY Aftercare process in these areas.
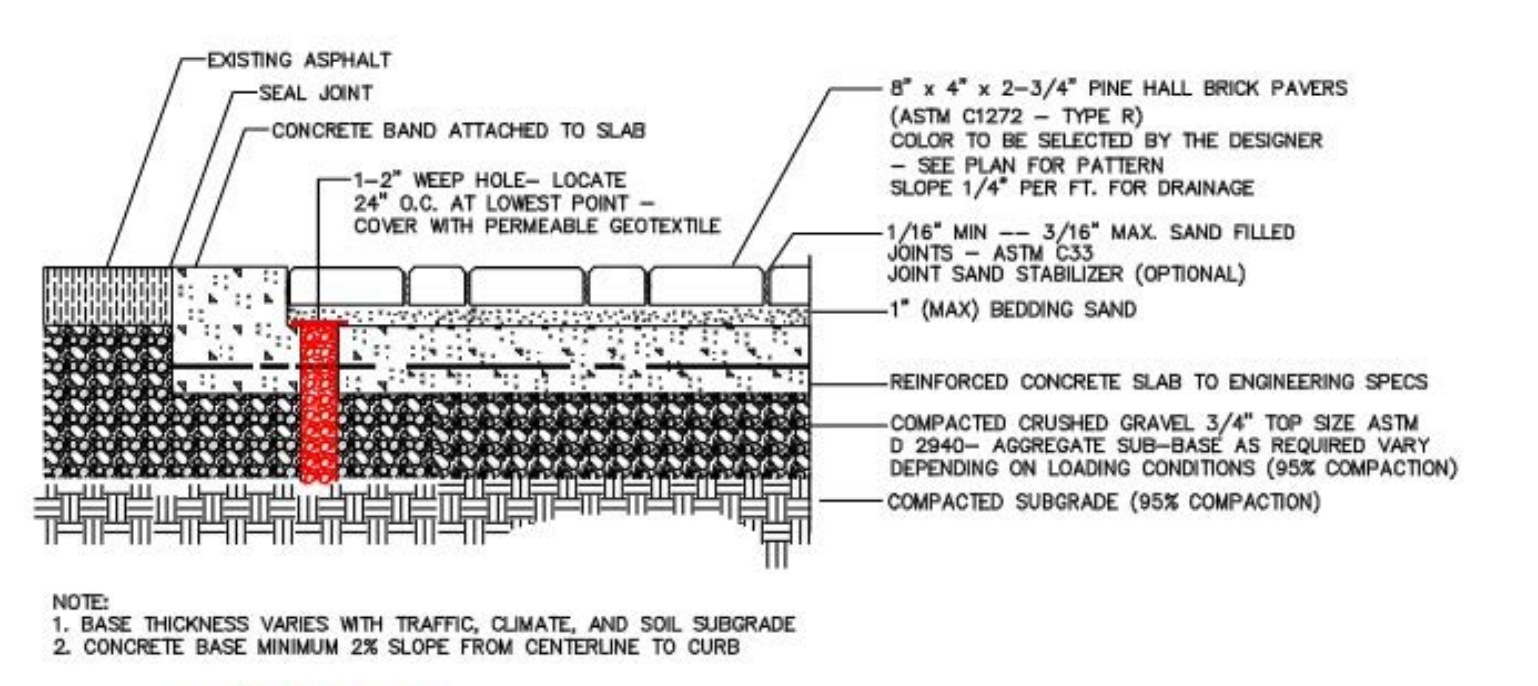
2. Pavers are installed over top of concrete without subsurface drainage considerations: It’s ok to install pavers over top of concrete, however, its important to have a way for moisture that works its way through the pavers to escape. This is typically accomplished by drilling weep holes through the concrete to allow moisture to escape. If this isn’t done, the moisture will get trapped between the concrete and pavers and keep the pavers and sand joints wet. This will lead to sand loss and also efflorescence issues (whiting of the surface). Here is a diagram to explain how pavers should be installed over top of concrete. Please watch the video above for further explanation.
3. Walls, lawn or landscape beds installed too high around perimeter of pavers: When water hits the surface of pavers, it must be able to freely drain off the surface of the pavers. If it’s trapped by walls, raised landscape beds or lawn areas higher than the pavers, this moisture can cause long term problems for polymeric sand joints. Watch this video for more information.

